Table of Contents
Getting Started
What is Exxat
Exxat is the system used to track and manage your College of Public Health clinical and field experience. It is used to track:
- Clinical and field placements
- Evaluations
- Feedback
- Clearances and background checks
- Timesheets (if applicable)
For a general overview of how to use Exxat and instructions on how to login and create a profile, watch Exxat's Getting Started: Video (18:04).
Activate Your Account
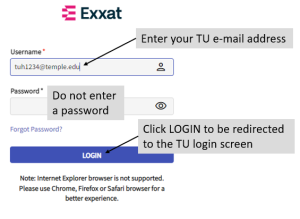
- From your browser, go to: login.exxat.com
- Use Chrome, Firefox, or Safari
- Do not use Internet Explorer; it will not work
- Enter your AccessnetID@temple.edu e-mail address in the Username area on the Exxat login screen and click NEXT
- Do not enter your TU e-mail alias address; it will not work
- For example, if you are Anisa Nuyen, use tuh1234@temple.edu, not anisa.nuyen@temple.edu
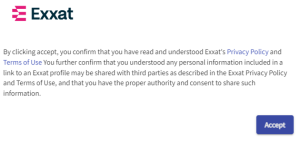
- Click on Accept to agree to Exxat Terms of Use
- You will only need to accept the terms the first time you log in to Exxat
- Logon with your TU AccessNet username and password
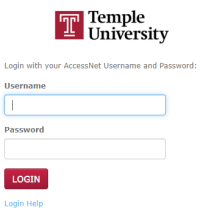
- You may be prompted for Duo Multi-Factor Authentication. If so, follow the instructions to complete the login process
The Exxat Dashboard Screen
After you login, the Dashboard screen will be displayed.

Create Your Profile
Your Profile contains information about you and your program and will assist faculty in determining appropriate placements. It is also your professional introduction to clinical sites and is an important step to making a great first impression.
- From the Dashboard, click on Profile, and then click on the Profile tab
- Click on the area you wish to edit; to make changes, click on the Add (
 ) and/or Edit (
 ) icons
Important: DO NOT change your e-mail address. It must remain your AccessNet@temple.edu address. Otherwise, you will not be able to log in.
- When complete, click Save
For additional instructions, refer to the Exxat Completing Your Student Profile Guide.
Get Help
- The Exxat Prism Help Forum: From the Dashboard, click on the Help button or clicking on the question mark icon at the top right side of the Exxat screen; provides documents and video tutorials to guide you through common tasks
- For assistance with placements, please contact your instructor
Logging Out
- Click on the drop-down arrow (
 ) next to your name in the upper right corner of the screen
- Click on Logout at the bottom of the User setting pop-out box